“Put one image on top of another” is the plain-language description of an image overlay. One picture supplies the canvas, and a second picture becomes a movable layer above it. You can make the upper layer large enough to cover the entire canvas, small enough to act as a logo, or partly transparent so both pictures remain visible.
Other phrases describe the same basic task: add a picture to a picture, place a photo over another photo, superimpose pictures, insert one image into another, or create a picture-in-picture effect. The controls you need are the same: layer order, position, size, opacity, and an export format.
The fastest route is to open OverlayImage.app, upload the main picture, add the second picture, and arrange it directly on the canvas. This guide explains that workflow and helps you choose the right settings for common results.
The difference between “on top” and “next to”
Before you begin, decide whether the two pictures should share space.
When one image is on top of another, their canvas areas overlap. The upper picture may hide some of the lower picture, or transparency may let both remain visible. This is the right structure for a logo, watermark, texture, sticker, inset photograph, or double exposure.
When two pictures are next to each other, neither one covers the other. Their complete widths or heights are preserved in a larger canvas. That is a merge rather than an overlay, and it works well for before-and-after comparisons, product variants, instructions, and progress photos.
OverlayImage.app includes both. Choose Overlay when one picture should sit above another. Choose Side by side, Top & bottom, or Grid collage when every source image should remain fully visible.
How to put one picture on top of another
Step 1: Choose the picture that defines the canvas
Upload the image whose dimensions and composition matter most. If you are adding a logo to a product photo, the product photo should be the main image. If you are creating a portrait inside a decorative frame, the frame or background can be the main image depending on which dimensions you need to preserve.
Think of the main image as the sheet of paper. Every other picture will be positioned relative to its edges.
Step 2: Add the picture that belongs on top
Choose Add overlay image and open the second file. It appears as a selected layer. Transparent PNG and WebP files are especially useful because the invisible area around the subject does not cover the picture below.
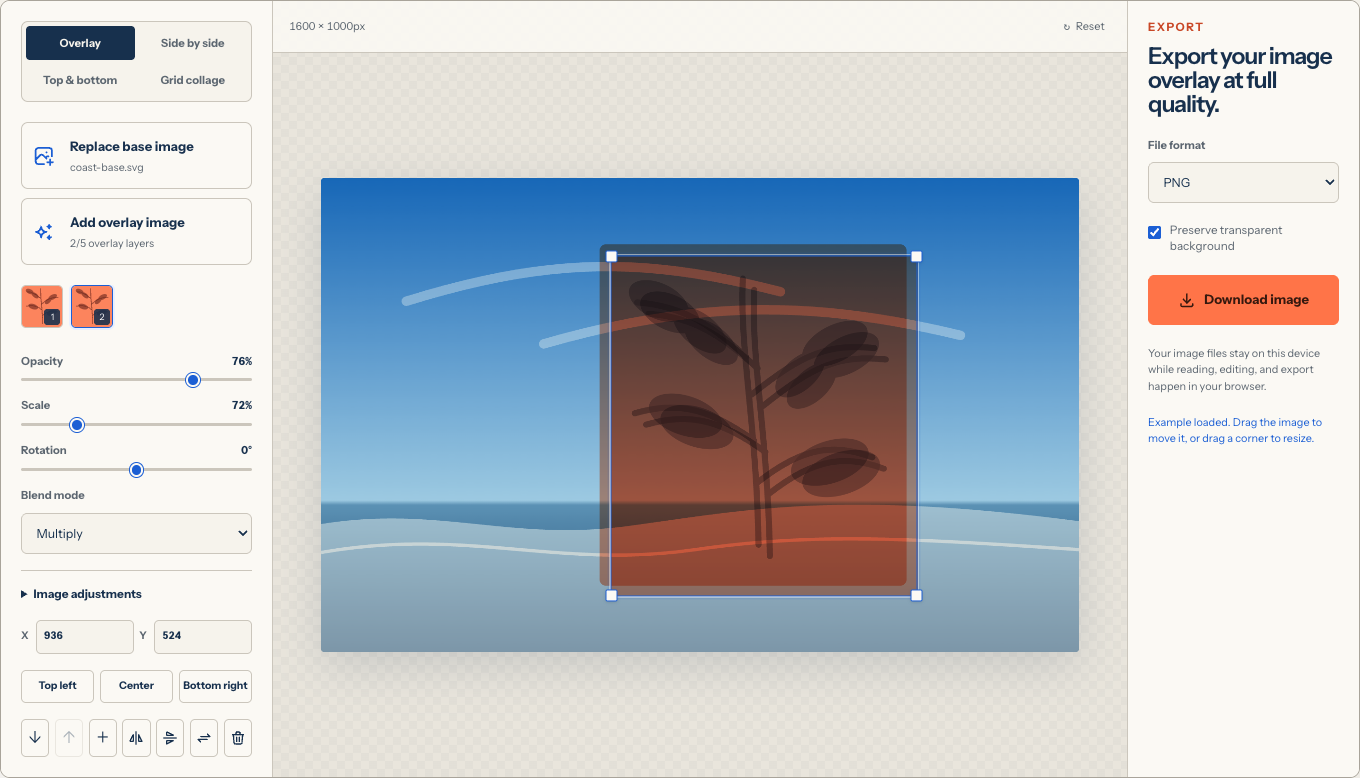
If your upper picture has an unwanted white or colored rectangle, the rectangle is part of the file. Opacity will make the whole rectangle translucent, but it will not remove it. For a clean logo or cutout, begin with an asset that already has a transparent background.
Step 3: Move and resize the upper picture
Drag the selected layer to the intended location. Pull a corner handle to resize it without changing its proportions. Use the center alignment control when the upper image should sit exactly in the middle.
For a small inset photo, leave a deliberate margin from the outer edge. An inset that almost touches an edge often looks accidental. For a logo or signature, choose an area with relatively quiet detail so the mark remains readable. For a full-frame overlay, enlarge it until it reaches the canvas edges when the source is large enough; if it cannot, use a larger source image rather than exceeding the editor’s 300% scale limit.
Exact X and Y fields are useful when you want consistent placement across several compositions. Record the coordinate and scale values from the first image, then use the same values for later images with matching dimensions.
Step 4: Decide how much of each picture should show
At 100 percent opacity in Normal mode, every opaque pixel in the upper picture is drawn fully over the layer below. Transparent pixels in the source remain transparent. Lowering opacity reveals more of the lower picture without changing the color-combination method.
For a straightforward watermark, Normal mode plus lower opacity is usually enough. For an artistic photo-on-photo result, try Multiply, Screen, Overlay, or Soft Light. Always compare the result with Normal mode because dramatic blending can hide color errors or reduce text legibility.
You can also adjust brightness, contrast, saturation, and blur for the selected layer. These controls help an inset photo match the surrounding scene or allow a texture to support the picture beneath it rather than dominating it.
Step 5: Download one finished file
Select PNG, JPEG, or WebP and download the result. The two sources are rendered into one output file. Your originals remain separate and unchanged.
Use PNG when the final canvas needs transparency or contains crisp graphic edges. Use JPEG for a finished photograph on an opaque background. Use WebP when you want a compact web image and broad modern-browser compatibility.
Four common picture-on-picture layouts
A corner logo
Keep the logo small, maintain clear space around it, and use Normal mode. If the main photograph has strong contrast, reduce opacity only slightly; excessive transparency can make the mark disappear on smaller screens.
A centered watermark
A large centered watermark can protect a proof, but it should still allow the subject to be evaluated. Begin near the middle of the opacity range and check both light and dark areas of the photograph. A watermark that is readable over the sky may disappear over a dark jacket.
An inset photo
An inset picture is a smaller rectangular image placed inside a larger scene. It works for reaction images, detail views, map insets, instructions, and visual comparisons. Use a consistent margin and consider whether the inset needs its own border before uploading. The current editor places images but does not create decorative frames automatically.
A full-frame photo blend
Resize the upper photo to cover most or all of the canvas when its source dimensions allow it; otherwise, use a larger source image. Lower opacity or choose a blend mode. Look for relationships between subjects, horizons, bright areas, and leading lines. Moving the overlay by a small amount can completely change which details remain visible.
How layer order works with three or more pictures
Every new overlay joins a stack. The main image remains at the bottom, while overlay layers can move forward or backward relative to one another. A layer near the front can cover all lower layers. A layer moved backward may become visible only where upper layers are transparent.
For example, a social graphic might use:
- A product photo as the main image.
- A soft color wash above the photograph.
- A price badge above the color wash.
- A logo at the front.
Select a layer thumbnail before changing its position or appearance. If a layer seems impossible to click on the canvas because another image covers it, select its thumbnail and use the forward control.
When to choose a merge layout
Choose Side by side or Top & bottom when both source images must remain fully visible, and use Grid collage for three or more complete images. In these layouts, the workbench renders images without applying overlay-only position, opacity, blend, or filter settings. The files remain available when you switch layouts.
Mistakes to avoid
Making the upper image unreadably small
Small is not the same as subtle. A tiny logo with fine text may become an indistinct mark after export or social-media compression. Judge it at normal viewing size.
Covering the subject by accident
Move the overlay away from faces, product names, instructions, and important edges unless covering them is the intended effect. Use opacity as a refinement, not as the only solution to poor placement.
Flattening too early
Keep overlays independent until the composition is finished. Once several elements have been flattened into one source file, changing only one of them becomes harder. The browser editor keeps uploaded overlay layers separate until download; the upload control accepts up to five overlay files.
Expecting transparency from JPEG
JPEG does not support transparent pixels. Use PNG, transparent WebP, or SVG for an upper image with invisible surroundings.
Frequently asked questions
What is it called when you put one picture on another?
It is usually called an image overlay, photo overlay, superimposition, or picture-in-picture composition. “Image merge” may also be used, although merge often means joining complete pictures without overlap.
Can I put a picture over another picture without Photoshop?
Yes. A browser-based layer editor provides the position, resize, opacity, blend, and export controls needed for static image overlays without installing a desktop design application.
Can the picture on top be transparent?
Yes. Use a source file with transparency, such as PNG, WebP, or SVG. You can also reduce the opacity of any selected overlay layer.
How do I move the picture behind another overlay?
Select its thumbnail and use the backward layer control. The main image remains the canvas background, while added overlays can be reordered among themselves.
Does putting pictures together upload them online?
OverlayImage.app processes the working files in the current browser. The image files are not sent to an image-processing server or stored in a cloud project.
To try the exact workflow, put one image on top of another now. If you want a broader explanation of formats and blend modes, continue with the complete image overlay guide.