You can overlay images on an iPhone without installing a dedicated editing app. Safari can open a browser-based image editor, read pictures you select from Photos or Files, let you move and resize the upper layer by touch, and save the finished composition back to your device.
This approach is useful when you need to add a logo, place a smaller photo inside a larger one, apply a watermark, blend two pictures, or prepare a quick social graphic. It avoids creating an account or moving the task into a large design project.
Open OverlayImage.app in Safari to follow the steps. The editor is responsive, and image processing happens in the current browser rather than on a remote image-processing server.
Before you begin on iPhone
Make sure the pictures are available in either the Photos library or the Files app. Safari’s file picker can show both locations, but the exact choices depend on your iOS version and where the source was saved.
For the cleanest result:
- Use the larger photograph as the main image.
- Use a transparent PNG, WebP, or SVG for a logo or cutout.
- Keep the original files in Photos or Files.
- Close memory-heavy browser tabs when working with very large camera images.
- Decide whether the final output needs transparency before choosing an export format.
If an image arrived through Messages, Mail, or another app, save it to Photos or Files first. That makes it easier to find from Safari’s upload picker and reduces the chance of choosing a low-resolution preview instead of the original attachment.
How to overlay two images on iPhone in Safari
1. Open the browser editor
Visit OverlayImage.app in Safari. The workbench appears before the marketing guide, so you can begin without scrolling through an article or opening a separate editor page.
On a narrow screen, the controls stack vertically: image controls first, the canvas preview next, and export controls below. This keeps the preview wide enough to use while preserving access to every layer setting.
2. Select the main photo
Tap Upload base image. Choose Photo Library, Choose File, or the equivalent option shown by iOS. Select the picture that should define the final canvas.
The main image should usually be the photo whose crop you want to preserve. For a product badge, use the product photo. For a watermark, use the finished photograph. For a smaller portrait placed inside a background, use the background as the main image.
3. Add the image that belongs on top
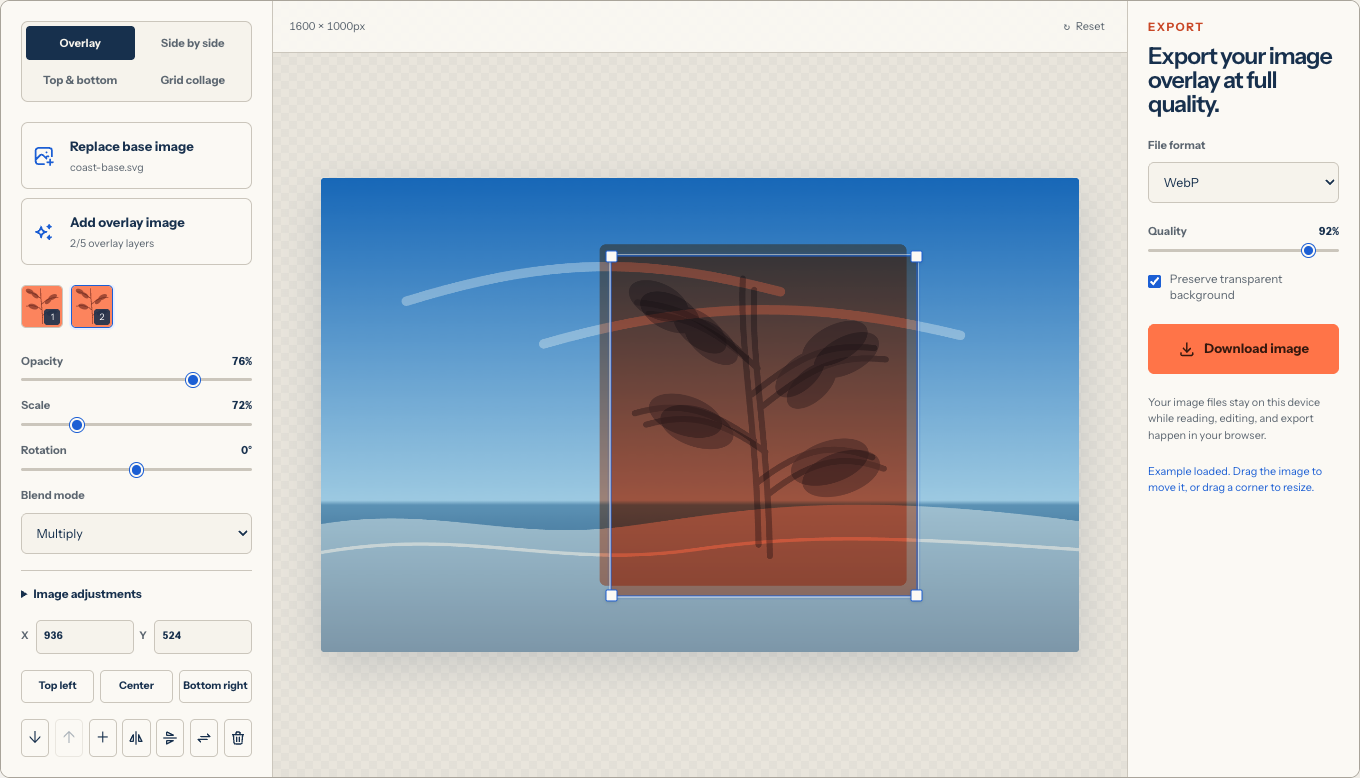
Tap Add overlay image and choose the second file. The new layer appears selected on the canvas. Its thumbnail also appears in the layer strip, which is useful when the image is small or partly hidden.
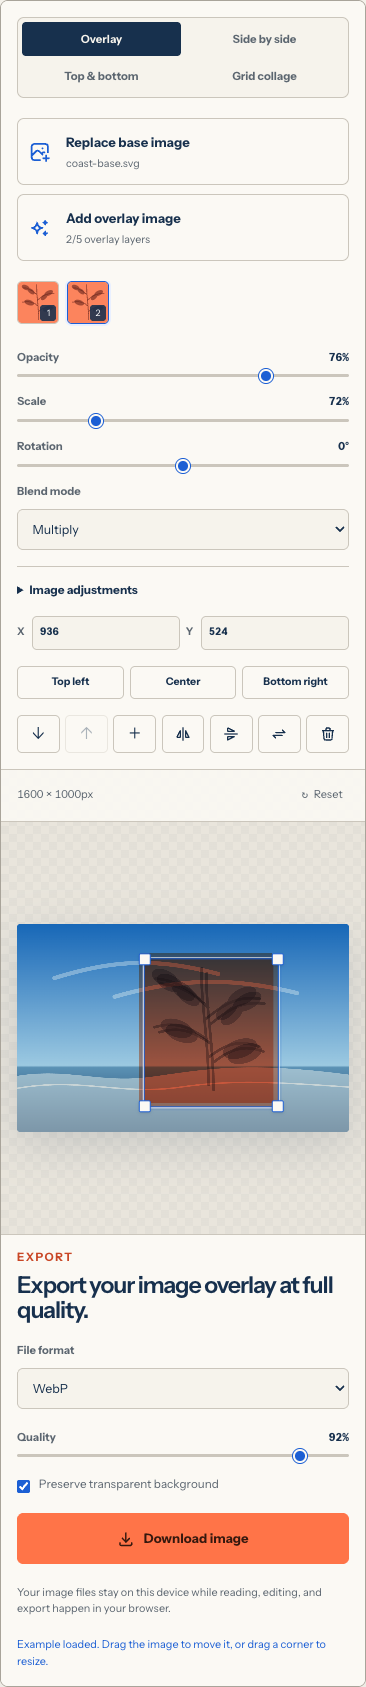
You can upload up to five overlay files. On a phone, a simpler composition is easier to control, so begin with one overlay and add more only after the placement works.
4. Move and resize with touch
Drag the selected image itself to move it. Drag a corner handle to resize it proportionally. The corner action preserves the original shape, which prevents a logo, face, or circle from stretching.
Touch screens do not have a mouse hover state, so the selected outline is important. If dragging moves the page instead of the picture, confirm that the overlay is selected and begin the gesture inside the image boundary. If the layer is extremely small, select its thumbnail and use the scale control before trying to drag it again.
Use the alignment buttons when finger placement is not precise enough. Center positions the selected layer exactly in the middle. The X and Y fields provide exact coordinates for repeated placements.
5. Adjust opacity and blending
For a logo or sticker, leave the blend mode on Normal. Lower opacity only when the mark should be less prominent. For paper texture, shadow, light, clouds, or color treatment, test Multiply, Screen, or Soft Light.
The iPhone preview may be smaller than the exported image because the canvas is scaled to fit the screen. Zooming the webpage can make controls harder to reach, so it is usually better to inspect the composition at the normal page scale, export a test, and view the downloaded image in Photos or Files at full size.
6. Download the result
Scroll to the export panel and select PNG, JPEG, or WebP. Tap Download image. Safari normally downloads the file; check the Downloads button or the Downloads folder in Files. The folder may be in iCloud Drive or On My iPhone, depending on your Safari settings.
To move a downloaded file into Photos, open it from Files, tap the Share button, and choose Save Image when that option is available. If Safari opens the image in a new tab, press and hold the image and choose the save action offered by iOS.
Which iPhone export format should you choose?
PNG
Choose PNG for a logo, graphic, screenshot, sharp text, or transparent background. PNG is lossless and may create a larger file than JPEG or WebP.
JPEG
Choose JPEG for a finished photograph that will have an opaque background. Increase or decrease export quality until the file is small enough without obvious blocks, halos, or damaged text.
WebP
Choose WebP for a compact image intended for a website or modern app. It can preserve transparency and often creates a smaller file than PNG. Some older workflows still expect JPEG or PNG, so check the destination before choosing it.
Useful iPhone overlay ideas
Add a logo to a photo
Use a transparent logo file, move it to a quiet corner, and keep enough margin around it. A logo placed against the very edge may be cut off by social-media crops.
Create a watermark
Add a signature or watermark file and lower its opacity. Check both light and dark parts of the photograph. A single opacity value can look strong over a bright sky but disappear over dark clothing.
Make a picture-in-picture image
Use a large photo as the canvas and place a smaller rectangular picture in a corner. This works for reaction images, travel details, product close-ups, instructions, and comparison graphics.
Blend two photos
Scale the second photograph as large as needed; if it cannot cover the canvas at the maximum scale, use a larger source image. Then lower opacity and test a blend mode. Position matters as much as the blend: align faces, horizons, light sources, or leading lines before refining the color relationship.
Join screenshots without overlap
Switch to Side by side, Top & bottom, or Grid collage when every screenshot must remain readable. This is better than overlaying for instructions, app comparisons, receipts, and progress sequences.
Troubleshooting image overlays on iPhone
Safari reloads while handling large photos
Modern iPhone photos can be large, and several full-resolution layers use substantial memory. Close unused tabs, remove unnecessary layers, or create smaller copies of unusually large source files. Because processing is local, the available memory depends on the device and current browser session.
The overlay has a white rectangle
The rectangle belongs to the source file. Use a transparent PNG, WebP, or SVG instead of JPEG. Lower opacity only makes the rectangle translucent; it does not remove the background.
The downloaded image is in Files, not Photos
Open the Downloads folder in Files, select the image, and choose Share > Save Image when iOS offers that action. If it is unavailable, keep the file in Files or export a format compatible with your Photos workflow.
The layer moves when you meant to resize it
Begin the gesture on a corner handle rather than inside the image. If the handle is difficult to reach, increase the scale temporarily, resize, then reduce the layer to its intended size.
Transparent areas become solid
Confirm that both the source and the export format support transparency. Choose PNG or WebP and enable the transparent-background option. JPEG always produces an opaque result.
Browser method versus a dedicated iPhone app
| Browser workflow | Dedicated editing app |
|---|---|
| No installation | Requires an App Store download |
| Opens directly at the task | May require onboarding or project setup |
| Files stay in the current browser session | Storage behavior depends on the app and account |
| Focused layer and export controls | May include text, drawing, templates, video, and other advanced tools |
| Best for quick static compositions | Better when you need a larger design workflow |
The browser method is not a replacement for every creative app. It is the shorter path when the goal is specifically to overlay or merge static images and download one finished file.
Frequently asked questions
Can I overlay pictures using only the iPhone Photos app?
The Photos app provides crop, color, markup, and related editing features, but it is not a general multi-layer image compositor. A browser tool or dedicated editing app is more direct when you need one photo above another.
Do I need to create an account?
No. OverlayImage.app does not require registration for the image overlay workflow.
Are my iPhone photos uploaded to a server?
The working image files are read, composited, and exported in the current browser. They are not sent to an image-processing server or stored in a cloud project by OverlayImage.app.
Can I use more than two pictures?
Yes. You can upload up to five overlay files above one main image. Keep mobile memory limits in mind when every source is a full-resolution camera photo.
Can I use the same steps on iPad?
Yes. Safari on iPad follows the same general workflow, with more screen space for the canvas and controls.
Open the image overlay tool on your iPhone and make the first composition without installing another app. For desktop and format details, see the complete online image overlay guide.